
Of all the advice home sellers receive, "declutter" is probably the most common — and the most vague. It's easy to tell someone to declutter. It's much harder to explain exactly what that means, room by room, surface by surface, drawer by drawer. That's why most sellers do a partial job: they clear the obvious stuff from the countertops and call it done, missing the dozens of smaller details that buyers notice (and judge) during every showing.
This guide is different. It's a specific, actionable, room-by-room checklist designed to be completed in approximately 30 minutes per room. Work through it systematically, and you'll have a home that's not just decluttered, but buyer-ready. Because here's the truth that professional stagers know: decluttering isn't about removing your stuff — it's about making space for the buyer's imagination.
"Decluttering isn't about minimalism. It's about creating enough visual breathing room for buyers to mentally move in."
Before you start: the three-box method
For every room, set up three clearly labeled bins or boxes:
- Pack: Items you're keeping but don't need for the selling period. These go to a storage unit, the garage, or a friend's house.
- Donate/Sell: Items in good condition that you no longer need. Schedule a donation pickup or drop-off for the end of the week.
- Trash: Broken, expired, or worn-out items. Be ruthless here — if you haven't used it in a year, it's not going to the new house.
The three-box method prevents the common decluttering trap of moving items from room to room without actually removing anything from the home. Every item you touch goes into one of these three categories. No exceptions.
Room 1: The entryway (30 minutes)
The entryway is where first impressions begin. Buyers need to see a clean, open, welcoming space — not a coat rack explosion.
- Remove all shoes. Every pair. Store them in closets or pack them.
- Reduce coats to 3–4 on hooks or in the closet. The rest get packed.
- Clear the console table or entry surface. Keep one item only: a small plant, a decorative bowl, or a candle.
- Remove all mail, keys, backpacks, and sports equipment.
- If you have an entry closet, remove at least 50% of its contents. Buyers will open it, and a half-empty closet suggests ample storage.
- Replace the doormat if it's stained or worn.
- Clean the front door — both sides, including the glass if applicable.
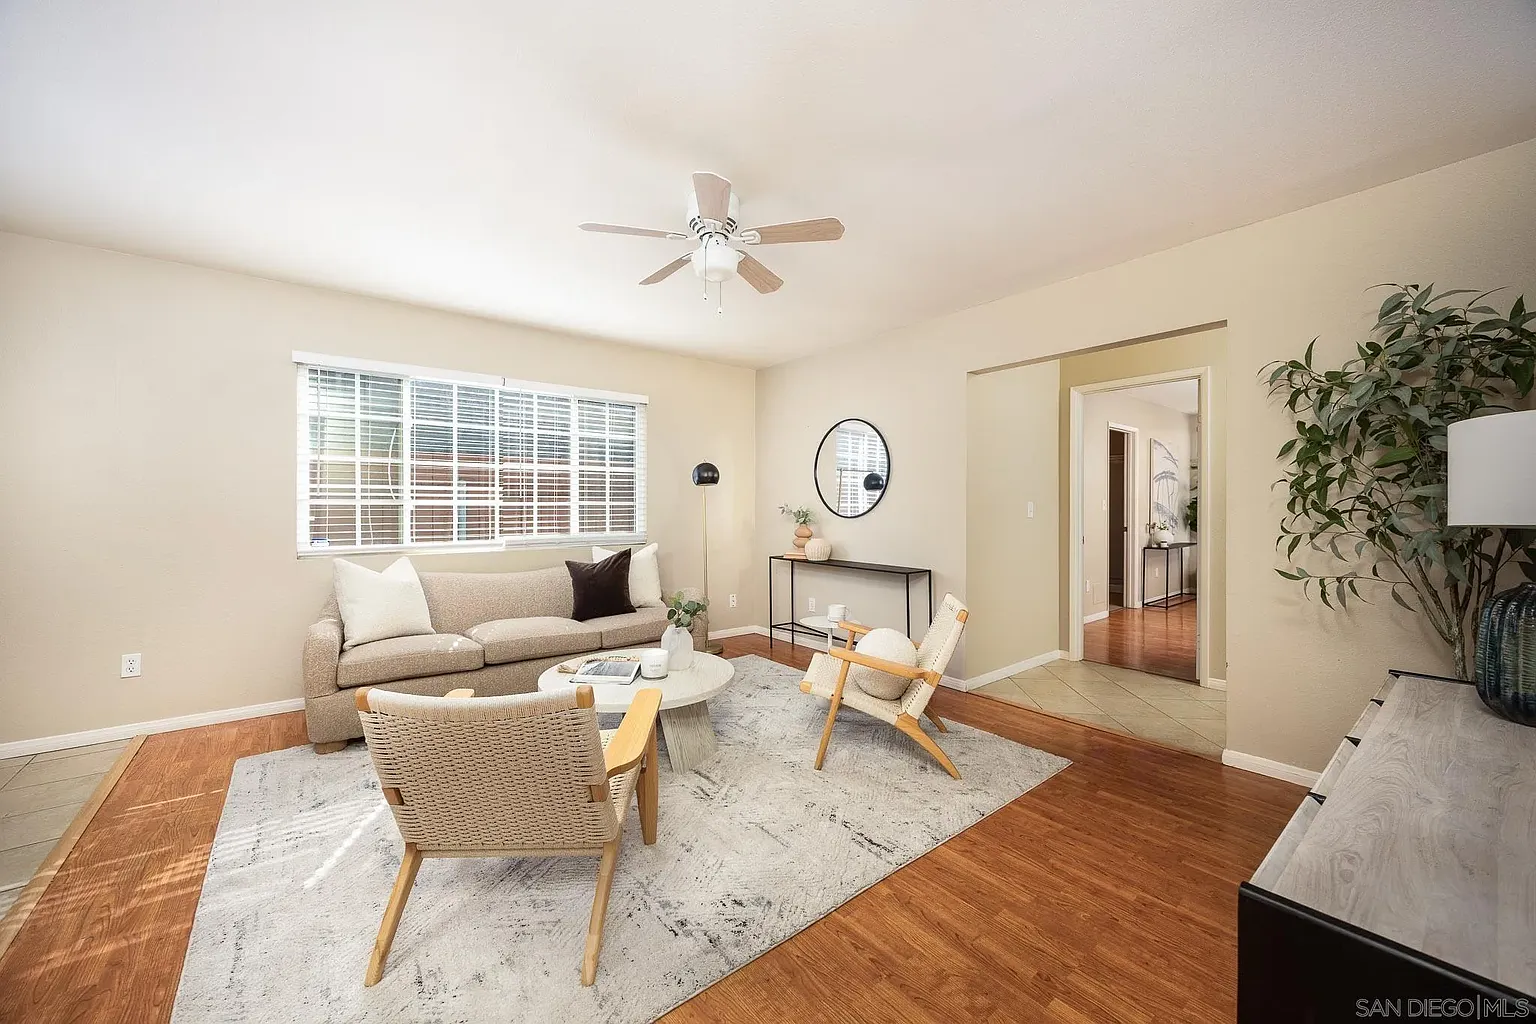
Room 2: The living room (30 minutes)
Buyers spend the most time in the living room, scanning every surface for cues about the home's condition, size, and livability.
- Remove all family photos. This is non-negotiable. Buyers need to imagine their own family in the space, and personal photos make that psychologically harder.
- Reduce decorative objects by 60–70%. If you have 12 items on a shelf, keep 4. Group remaining items in odd numbers (3s and 5s are most visually pleasing).
- Remove all magazines, books piled on surfaces, and remote controls. Tuck remotes in a drawer. A single coffee table book (architecture, travel, or cooking) is acceptable.
- Reduce throw pillows to 2–3 per sofa. They should coordinate, not match exactly.
- Remove all floor clutter: baskets of toys, pet beds, floor fans, exercise equipment.
- Clear the mantel. One piece of art above, and 3 objects maximum on the mantel surface.
- Bundle and hide all visible cords and cables. Cable management clips cost $5 and make a noticeable difference.
"If a buyer can count more than 5 decorative items from one standing position, the room is probably too cluttered to show well."
Room 3: The kitchen (30 minutes)
The kitchen gets the most scrutiny from buyers. Every surface, cabinet, and drawer is fair game. The goal is to make the kitchen feel spacious, clean, and functional.
- Clear all countertops. Remove the toaster, knife block, paper towel holder, fruit bowl, cookie jar — everything. Then selectively add back 2–3 items: a cutting board, a small plant, and one attractive appliance (like a high-end coffee maker).
- Remove everything from the refrigerator door. No magnets, no photos, no kids' artwork, no menus. The fridge door should be completely bare.
- Reduce cabinet contents by 30–50%. Buyers open cabinets. Half-empty cabinets communicate abundant storage; packed cabinets suggest the kitchen is too small.
- Organize under the sink. This is the #1 area buyers open during showings. Remove all cleaning supplies except a tidy caddy. Check for (and fix) any signs of moisture or leaks.
- Clear the top of the refrigerator. Nothing should be stored up there.
- Remove all pet bowls, kids' cups, and personal items.
- Deep clean the sink. It should gleam. Use Bar Keeper's Friend on stainless steel; bleach paste on porcelain.
For detailed kitchen staging strategies beyond decluttering, check out our guide to the 5 rooms buyers care about most — the kitchen section includes specific styling tips that pair perfectly with this checklist.
Room 4: The primary bedroom (30 minutes)
- Remove all nightstand clutter. Each nightstand should have only a lamp and one small object (a book, a small plant, or nothing).
- Remove all dresser-top items. Jewelry, perfume, loose change, photos — pack it all.
- Reduce closet contents by at least 50%. This is critical. Buyers evaluate closet size by how much empty space they see. Pack off-season clothes, duplicates, and anything you haven't worn in 6 months.
- Remove exercise equipment. The treadmill in the corner makes the bedroom feel smaller and less restful.
- Remove all laundry — clean and dirty. Laundry baskets should be invisible during showings.
- Make the bed meticulously. Hotel-style: fitted sheet, flat sheet, duvet or comforter, two to four pillows, one throw at the foot of the bed.
- Remove TV wall mounts if they leave significant holes. Patch, sand, and paint. If the TV stays, ensure cords are fully concealed.
Room 5: Bathrooms (20 minutes each)
- Remove all personal products from the shower and tub. Every bottle, razor, and loofah. Store them under the sink or pack them in a portable caddy you pull out only when needed.
- Clear the vanity countertop completely. Then add back only: a soap dispenser (matching the aesthetic), and optionally a small plant or candle.
- Remove all personal towels. Replace with two sets of matching white towels — hung or rolled neatly.
- Remove the bathroom scale, magazine rack, and trash can (yes, even the trash can).
- Clean the mirror until it's spotless. No water spots, no toothpaste spatter.
- Organize under the vanity: Like the kitchen, buyers check. Keep it minimal and tidy.
- Check the grout. If it's discolored, apply grout cleaner or a grout paint pen.
Room 6: Secondary bedrooms and office (30 minutes each)
- Remove furniture that makes the room feel small. If a bedroom has a bed, two nightstands, a dresser, AND a desk, it's probably overcrowded. Remove the desk or dresser.
- Define the room's purpose. A room with a bed, a desk, AND a craft table has no clear identity. Pick one function and commit to it.
- In the home office, clear the desk except for a laptop, a lamp, and one small object. Bundle and hide all cables. Remove personal files, sticky notes, and anything that makes the desk look like an active workspace.
- Remove wall-to-wall shelving clutter. Books should be edited to 40–50% capacity, with spines aligned and interspersed with a few decorative objects.
- Kids' rooms: Remove at least 70% of toys. Pack them. The room should look like a lifestyle catalog photo, not a playroom.
Room 7: Garage and storage areas (45 minutes)
Buyers open the garage. They look in the attic. They check the basement. These spaces need attention too.
- Remove at least 50% of garage contents. Rent a storage unit for the selling period if needed — it's worth the $100/month investment.
- Organize what remains on shelving units. Clear floor space is the priority. Buyers want to see that the garage can hold their cars, not that it's currently a storage unit.
- Sweep and, if possible, seal or paint the garage floor. Epoxy garage floor kits run $50–$100 and make a dramatic difference.
- In basements and attics, create clear pathways and remove anything broken, moldy, or clearly abandoned.
"Rent a storage unit. Seriously. The $100/month cost pays for itself ten times over when your home sells faster and for more money."
The decluttering mindset shift
The biggest challenge in decluttering isn't the work itself — it's the emotional resistance. Sellers often struggle to remove personal items because the home still feels like theirs. Here's the mindset shift that helps: the moment you decide to sell, the home is no longer yours. It's a product. And like any product, it needs to be packaged and presented for its target audience.
This doesn't diminish your memories or the life you lived there. It simply acknowledges that selling a home is a business transaction, and the most successful transactions happen when the product is presented in its best possible light.
What comes after decluttering?
Decluttering is the essential foundation, but it's just the first step. Once your home is decluttered, you're ready for:
- Deep cleaning: Professional deep cleaning ($200–$400) reveals the true condition of surfaces, fixtures, and finishes.
- Touch-up paint: Scuffs, nail holes, and worn areas are much more visible after decluttering. Address them with matching paint. For guidance on the best paint colors for selling, read our guide to paint colors that sell.
- Professional staging or styling: With the clutter gone, a professional stager can see the home's true potential and create a buyer-targeted presentation. Our full-service staging and in-person styling services are designed to take a decluttered home to market-ready.
Need help prioritizing your pre-listing preparation? Our expert design advice consultations give you a clear, personalized plan — or get a Smart Quote for a quick estimate on staging services that fit your timeline and budget.